How to Replace a Trim Board
Peak Pro Painting • May 25, 2015
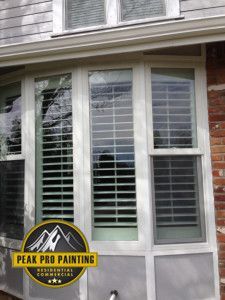
1. Remove the old boards & siding
2. Measure for the new piece
3. Ensure Perfect Placement
The post How to Replace a Trim Board appeared first on Peak Professional Painting.
Ready to work with Peak Pro Painting?
Let's connect! We’re here to help.
Send us a message and we’ll be in touch.
Or give us a call today at 720-399-7325
Agency Contact Form
More Painting Tips, Hacks and Suggestions

Explore how expertly managed repainting projects can revitalize HOA communities, overcoming common challenges with ease. Discover how Peak Pro Painting offers trusted solutions that enhance community appeal.
Unlock the secrets to a stunning home transformation with expert tips on interior and exterior painting. Learn how to tackle common challenges and explore how Peak Pro Painting can be your go-to solution.
Homeowners and property managers facing inconsistent paint finishes often overlook the importance of sanding. Discover how Peak Pro Painting ensures pristine surfaces and flawless results by integrating expert sanding techniques into each project.
Discover how Peak Pro Painting can revitalize your apartment with top-notch painting services. Learn about the common obstacles renters face and why choosing a professional is crucial for a seamless paint job.
If you’re looking to get the most out of your exterior stain, try using a solid stain instead of semi-transparent. It looks similar to a paint but it doesn’t go on as thick. Solid stains still show a little of the wood grain but do cover mostly like a paint. You’ll get more life out of solid stain. It also saves you money!
Sherwin Williams is always coming out with beautiful colors that we love!! One newer color by Sherwin Williams is Amazing Gray. It’s a nice warm gray that goes good with a lot of different accent colors and of course flat white ceilings. Let our expert residential painters for more information and a quote.
Most paints on the market now are low VOC and were seeing more and more ZERO VOC paints hit the market. We recommend ZERO VOC inside your home when there is a pregnant woman, a baby in the house or small children. Ask your rep if VOC is recommended in your home. Let our expert residential painters for more information and a quote.
Safety is the number one priority of Peak Pro Painting during the COVID19 Pandemic. What we are promising to our staff, as well as to the homeowners that we are privileged to work with: We will maintain social distancing in the office as well as when in public. No handshaking or physical touching needs to take […]
The post How We Handle Our Customers’ Safety appeared first on Peak Professional Painting.
The post How to Perform Exterior Staining appeared first on Peak Professional Painting.
The post How To Paint a Stained Interior Railing appeared first on Peak Professional Painting.