How to Mask a Window
Now here is one thing you must know when painting your home: how to mask a window. Imagine looking out your window only to see it dusted with paint splatters and streaks of paint! No thank you, Peak Pro’s professional home painters prefer preparation and masking. Not to mention Windows can be really expensive to replace, so why take the chance when painting the exterior of your home? In this blog Peak Pro will let you in how our Highlands Ranch painting company masks a window the professional way.
An important thing to remember is that you should always keep in mind of your surroundings when painting. There is a good chance that your windows aren’t the only thing that will need masking. Masking the exterior of your home is a lot like masking an interior room. You don’t want to take any chances with your valuables or other items that you aren’t intending to paint. This is why Peak Pro always recommends that you thoroughly mask the widow and all things in close proximity. Take particular precautions when using methods that have a large chance of splattering like sprayers. Check out this educational video of how to spray a house exterior before spraying your house.
Have the right tools for the job:
First things first, you will want the right tools for the job. This will make your life much easier, because there are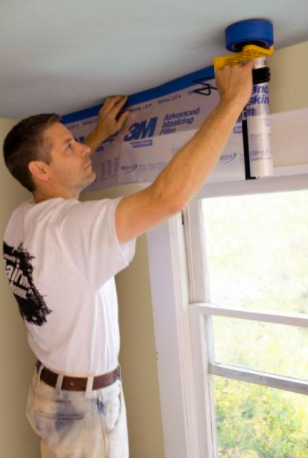 certainly wrong tools for the job, like newspaper and duct tape! Most importantly you will need a hand masker with a sharp blade on it. This may seem a little fancy, but well worth the investment. This tool will speed up the most painful part about masking. Hand maskers are a cool device that perfectly lies down your painters tape and masking plastic all in one smooth motion. The next thing your Denver commercial painting company recommends for the job is 6ft masking plastic that you will place on the roll of your hand masker. When choosing the tape to use on your hand masker, Peak pro recommends using a 1 inch masking tape. However if you are less experienced and want more leeway and more coverage, you might want to bump up the thickness to 1.5inch
First step:
Now a hand masker makes this process really easy, and can cut down the process into just two steps. First you will want to run the masker across the top of the window and smooth out the tape so there are no bubbles or gaps where paint can find its way in. This will leave you with a stream line of painter’s tape attached to your painters plastic that will be hanging just below it in a nice folded fashion.
Second Step:
Now here’s the easy part. Seriously. Pull down the painter’s plastic that you just taped to the top of the window, and cut to desired length. Now the only occasion you won’t be cutting the painter’s plastic is if you have a ginormous window bigger than 6ft. Hopefully you considered that when buying your painter’s plastic because it typically runs 6ft tall.
Last but not least: Tape!
Simply tape the entire edge of the window on the remaining sides of the window. Peak Pro recommends to tape the painter’s plastic down with a few small pieces to secure it before fully lining the periphery with tape. Make sure that you extend the tape enough to cover trim that you don’t want to be painted.
If you aren’t the DIY home exterior master, or just don’t have the time. Our Peak Pro painters for homes will help you paint the interior and/or exterior of your home for you in surrounding areas of Denver CO and Austin TX. Have a business that needs exterior painting in Denver area, Peak Pro does Denver commercial painting as well as interior and exterior painting in Denver. Click this link to request a quote.
The post How to Mask a Window appeared first on Peak Professional Painting.
Ready to work with Peak Pro Painting?
Let's connect! We’re here to help.
Send us a message and we’ll be in touch.
Or give us a call today at 720-399-7325